
It’s time for another dive into my vast pile of workshop handouts! I have been using this technique a lot lately, as it is my favourite method of colouring comics. Usually I like to do the ink work first and then colour inside the lines with watercolour, but I’m considering being daring for one of my current projects and starting with the watercolour, then adding the ink lines afterwards, with a light touch, as needed. Updates on that after I actually work up the courage to do a whole long project that way!
Pen and Ink can be added to watercolour after the paper is dry to enhance details, sharpen lines, create textures, and bring up contrasts. Any pen and ink technique can be used: crosshatching, stippling, scribbles, patterns, contour lines, etc. — think about how the pen and ink technique you choose will interact with the look of the watercolour passage to which you are adding it. If your ink is waterproof (test it first!!!), you can work back and forth between the ink and the watercolour.
Besides black inks, there are also beautiful coloured inks that can blend well with watercolour; again, just make sure they are waterproof. These can also be used instead of watercolour, but be aware that they don’t lift out like watercolour does if you decide you want an area lighter.
There are many styles of combining the two media, and experimenting will help you find your own style. Here are a few examples that you can look for in books, in galleries, and all around you in advertising, illustrations, packaging, and more. And of course there are as many styles as there are artists — this list is just a rough categorization to get you started thinking about all the ways these two mediums can combine.
Ink Drawing First methods:
- The colour-in-the-lines method: This involves making a solid, sometimes quite detailed, pen and ink drawing, and then treating the outlined spaces as fields to be coloured in solidly. A simple example would be the comic book style. The focus in this style is the outline.
-
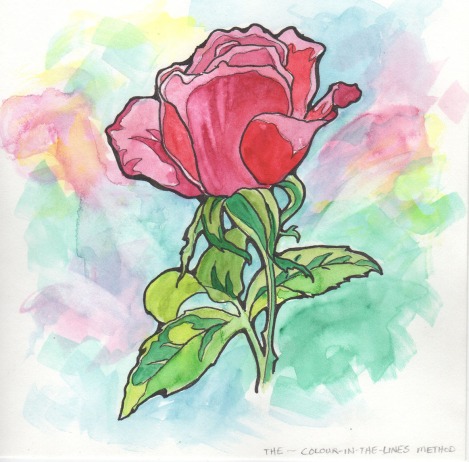
Colouring in the lines — Well, mostly. The main structure is provided by the lines, though, so even though I did put in a bit of shading, rather than flat colour, it still comes out a bit like a comic book rose.
- The watercolour-as-shading method: A variation on the previous style, this uses watercolour to provide the impression of 3-d to the drawing. The spaces are filled with colour, not flatly, but using variation of darks and lights or colours to show light and shadow. The drawing may or may not have details such as stippling or crosshatching supporting the shading.
-
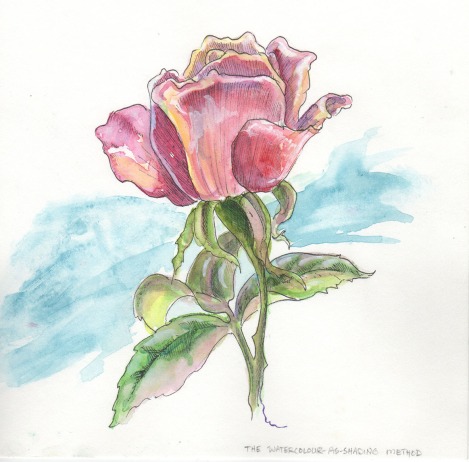
Watercolour as shading — I did some shading with the ink first, then used darker watercolour wherever I had shaded with the pen lines.
- The splash-of-colour method: This is where the watercolour is brushed on loosely in a rough correspondence with the ink drawing. Sometimes it is used in just one small area to highlight a center of interest.
-

Splash of colour — I was also demonstrating masking with masking tape on this one, which made the impression of a trellis behind the rose. Notice that I made very little attempt to stay in the lines here.
- Watercolour First methods:


- The toning-the-paper method: Using watercolour, the artist ‘”tones” the entire paper with washes — to provide some nebulous forms to spark the imagination, or just to to get past that “blank white page”. The wash can be smooth or textured, flat colour or graded. Sometimes the toning is used as a middle ground and the artist uses both dark inks and white to bring out the three-diminsionality of the subject.
-

Toning the Paper — here I just dropped a lot of colours into the wet paper and allowed them to mingle. Fun to watch! I also could have just made the wash one colour, and smooth. The rose could have been further coloured to bring it out as a solid shape, but in this case I rather liked it just as a superimposed drawing.
- The suggestion-of-colour method The watercolour here is used as a loose pre-drawing, perhaps in conjunction with a light pencil sketch. The ink work is then drawn using the colours as a rough guide, but without worrying about an exact match between the colours and the drawing.
-
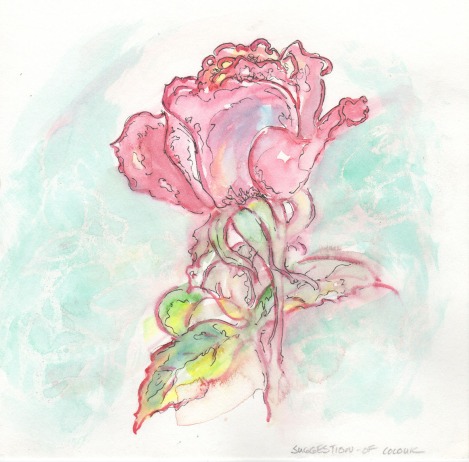
A suggestion of colour — very loose and scribbly pen and ink with very loose and scribbly watercolour. I let some of the colours blend and blur, and for the background I applied a white crayon resist — more scribbling with the white crayon on the blank paper, then covered with a light wash; the wax resists the watercolour.
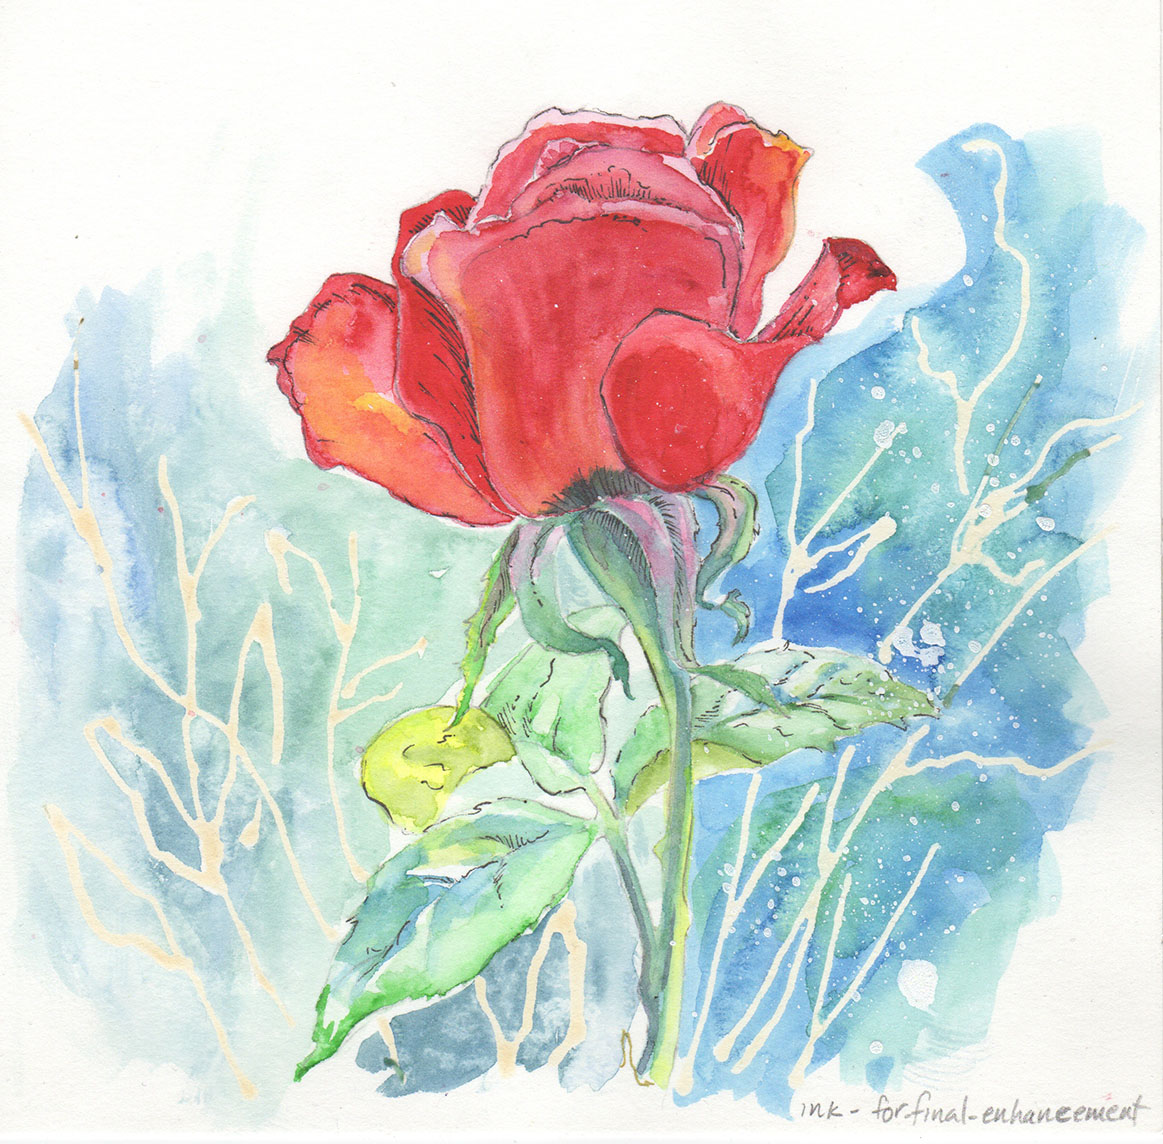
- The ink-as-final-enhancement method This is using the ink drawing as a final detailing of a complete watercolour painting. It can be for additional shading, to highlight a center of interest, to strengthen linear features or contrast, or to add details difficult to achieve in watercolour alone.
-

Ink for final enhancement — there’s very little actual ink on this one, just enough where the edges needed some reinforcing. For the background, I was demonstrating how to use masking fluid. I was going to fill in the branches, but leaving them white made the odd juxtaposition of a wintery scene with a blooming rose. Very poetic, thought I.
I hope you’ve enjoyed reading about this technique and try it out!


Thank you for the clear directions for watercolors. Now where did I put my scribble book… 🌹🌸🌷🌼🌺🌻
LikeLiked by 1 person
You’re welcome! Now I want to know, how did you make those cool little flowers?
LikeLike
Those symbols 🌼🌻🌺🌸 are included in my phone & tablets keyboard. They don’t work in the posts 😓, but most of the time they work in the comments. 🍦🐢🐩🐹 Some are odd… 🚀🚒🎉👹 I think they are technically a font. I just think they are cute. 🙊🙈🙉
LikeLike
They are cute! But I work from a computer, so I guess I’d have to have the right font, if it exists for computers. Thanks for enlightening me — if I ever get a cellphone, I’ll look for that as one of the features!
LikeLike
Hmmm, you are right, maybe they are part of a ‘font’ you could download for the ‘puter. I’m going to look also. If I find something, I’ll let you know!!
LikeLike
That would be great! Thanks, and likewise!
LikeLike
Just what I needed
LikeLike
Glad to hear it! BTW, I clicked on your URL and it’s coming up as unfindable. New site?
LikeLike
Pingback: Castles and buttefies | Ana's Learning Lab·
Pingback: Castles and butterflies | Ana's Learning Lab·
Thank you Karen for putting this article together. While I use some of these techniques and am unlikely to use some of the others, it was good to see them all laid out in one place.
LikeLike
You’re very welcome, Vincent! I’m glad you enjoyed it!
LikeLike
What kind of markers do you use when you draw before you use the watercolor? I’ve tried doing that and I don’t know if I just need to let the marker dry for a long time, or what, but when I try and paint around the ink, the ink bleeds. Do you have any tips?
LikeLike
Hi there! I use Pigma Micron pens for most of my ink work — they are permanent, lightfast, and come in a good range of different sizes (and even “brush”-tips!), as well as colours (but I use mostly black). I can watercolour over them immediately on most papers — but be aware that slicker papers with a lot of clay coating (papers made for markers fall into this category) may delay drying time. But then you probably wouldn’t want to use watercolour on those papers anyway! Pitt pens and markers also hold up to the waterproof rule, but I find their tips break down faster than the Pigmas.
I also use several varieties of liquid ink, with various tools: Good old black India ink and FW Acrylic inks, which come in beautiful colours I use with dip pens or brush. And one of my favourite tools is the Pentel brush pen, which has a real brush tip fed by cartridges of ink which is similar to India ink. All of these are waterproof and lightfast. The FW acrylic ink can also be used to paint with, as with watercolour; it handles a bit differently, but with some practice it’s easy to get used to.
One other ink that I use a lot is the Liquitex acrylic ink in white (haven’t tried the other colours, but I understand they are good). This is for when I need to apply white solidly over a painting, like for stars or snow or highlights. It sometimes picks up a bit of the colour from the watercolour over which it is applied, but since it’s acrylic, a second application can be applied over the previous layer, which has effectively sealed in the watercolour underneath.
These are all common supplies, which can be found in most art supply stores in North America, and easily on the internet.
Thanks for reading my blog and following! I hope this information is useful! (and you’ve given me inspiration for a future post, so thanks for that too)
LikeLiked by 1 person
Thank you so much!!
LikeLiked by 1 person
Absolutely delightful. This is all new to me. I have been oil painting for years but was watching the cartoon, “Stella and Sam” and loved the artwork so decided to read your article.
LikeLike
Thank you, Julie, I’m glad you enjoyed it. I had never heard of “Stella and Sam”, so watched one on you tube — absolutely delightful — thanks for turning me on to it! There are certainly some cool watercolour-like effects in it, though the artwork is almost certainly digital.
I’ve got several how-to posts on watercolour as well; there are some handy blue buttons at the top of the left sidebar for those.
LikeLike
Thank you Karen for the variations of examples in ink and watercolor flowers. All are beautiful and each one has its own statement. I’m going to try it and teach my friends.
LikeLike
Hi Cyndie, I’m so glad you enjoyed it. Have fun sharing the techniques with your friends!
LikeLike
So beautiful and I was just wondering if you can tell me what type of pens you use on the watercolors? I’m a complete newbie.😊
LikeLike
HI Sarina, I’m glad you enjoyed it! I used Pigma Micron pens:
https://www.jetpens.com/Sakura-Pigma-Micron-Pens-XSDK/ct/223
But you could use any kind of pen that doesn’t bleed when wet. I also use regular old dip-pen and India ink, the classic, which take a bit of practice to get the hang of, but which has the advantage that you don’t end up with a bunch of un-refillable and un-recyclable plastic husks! However, of all the disposables, the Pigma Micron pens are very long-lasting, so not too bad that way.
LikeLike