
My webcomic, Mermaid Music, is between chapters right now, and while the next one is under construction (I’m currently in scripting mode), I thought it was a good time to make some character maquettes for the next stage, as I’ll be introducing quite a few new characters in Chapter 2. Most of them will be busts, just the head and shoulders so I can get the facial features right, but tonight I had a hankering to do a full-body mermaid.
It takes a while to make these, so this will be a series which I’ll post as I go. I took these pictures with my iPad, which doesn’t seem to mind the low light levels. it’s been a great tool for all of my maquette tutorials.
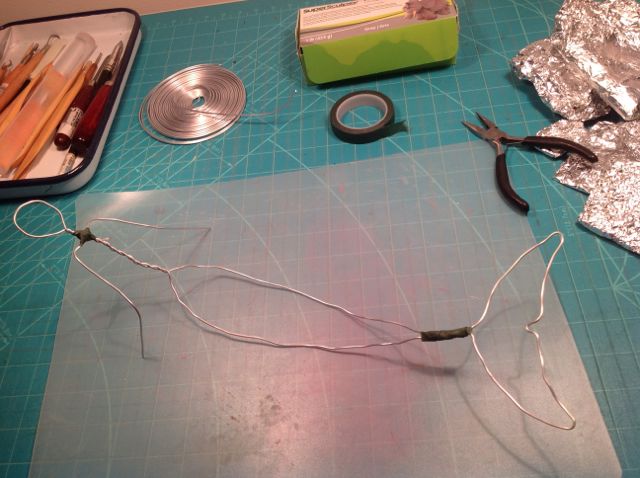
I started off with one of my standard maquette figure armatures. I made a batch of these, all the same size, a while back. The wire is a soft aluminum armature wire, which is easy to mould and position; any craft or art supply store should have this. I’ve also used coathangers (hard to bend, but very sturdy) and various sizes of wire from the hardware store.

Instead of turning the ends of the legs into feet, I twisted the wire together and made another piece for the tail.

I hooked the tail on to the rest of the armature with florist tape (also available in craft stores). It’s very useful as it sticks to itself if you pull it slightly and press it in place as you go, and moulds beautifully to the shape of whatever you’re binding, unlike masking tape, which is not so flexible.
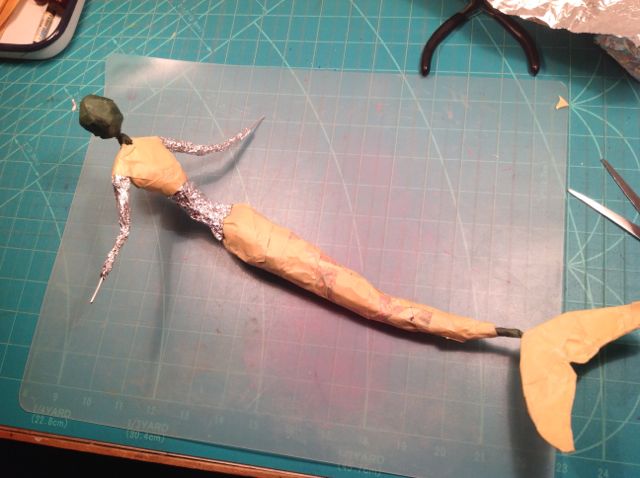
Then I started stuffing newspaper into the body to fill it out. In the past I’ve used recycled aluminum foil for this (I wash and save used foil; I don’t use it much, but I’ve now got friends who give me theirs!) but it makes the piece heavier. I’m in a couple of paper mache groups on Facebook, and someone mentioned that paper mache stuffings work just fine for polymer clay as well, which makes sense, because the clay is baked at a low temperature. Since polymer clay is expensive, some people have tried building all the inner layers up with paper mache, and use polymer clay only for the final skin and fine mouldings. Since this is such a small piece, I don’t think I’ll do that, but would like to try it sometime.
Notice here that I’m really compacting the newspaper stuffing — always make your inner shape much skinnier than your intended finished piece. You need to allow for about a quarter inch of polymer clay, or more, on top of it. (The same applies if you are using paper mache clay.)

Here’s the finished wrapping of the lower body; I also made a ribcage to start the stuffing of the upper body. I just wrapped some newspaper around the spine and held it in place with tape.

I filled in the tail with masking tape; the scissors are there because I had to cut out the little notch after I was done. There are several layers of tape.

I wrapped the arms with aluminum foil, as newspaper would be too lumpy and hard to mould. Here one arm is finished, and the other has just started having its wrapping applied. It’s hard to see, but the end nearest the head is doubled over, so the upper arm will get more bulk. For the head I made a little ball of foil and compacted it well, then stuffed it into the circular armature and bound it in place with florist tape.

Here’s the last photo for tonight. I’ve made her a waist out of aluminum foil, so now she’s ready to apply the clay. But first I’ll be making her hands separately, and attaching them to the armature.
Hope you’ve enjoyed part one of this maquette series! I’ll post more as I work on her, and each one will be added to the “polymer clay maquettes” tab in the left sidebar.

Pingback: Making a Mermaid Maquette | Mermaid Music·
Happy Tuesday to you by Rinaldo from Venice Italy☺.
LikeLike
Thank you, Rinaldo!
LikeLiked by 1 person
Love the armature…nicely developed.
LikeLike
Thank you! Haven’t had time to get back to it, unfortunately — it’s been a very busy summer. But soon, soon…
Just had a look at your work and decided to follow — lovely! I’ll have to go back for an in-depth look later, but it lifted my spirits just in a quick browse!
LikeLike